Reposted from the original at https://blog.stephenturner.us/p/development-environment-portable-reproducible.
You upgrade your old Intel Macbook Pro for a new M4 MBP. You’re setting up a new cloud VM on AWS after migrating away from GCP. You get an account on your institution’s new HPC. You have everything just so in your development environment, and now you have to remember how to set everything up again.
I just started a new position, and I’m doing this right now.
Setting up a reproducible and portable development environment that works seamlessly across different machines and cloud platforms can save you time and headaches. These are a few of the strategies I use1 to quickly reproduce my development environment across machines.
Dotfiles in a GitHub repo
New VM setup script in a GitHub repo
R “verse” package on GitHub
Dev containers in VS Code
Keep your dotfiles in a private GitHub repo
Dotfiles are the hidden configuration files in your home directory. Examples include .vimrc for Vim, .tmux.conf for tmux, or .bashrc for your shell environment. I have a long list of aliases and little bash functions in a .aliases.sh file that my .bashrc sources. I also have a .dircolors, global .gitignore, a .gitconfig, and a minimal .Rprofile.
Keeping
these files in a GitHub repository makes it easy to quickly reproduce
your development environment on another machine. If you search GitHub
for “dotfiles” or look at the awesome-dotfiles repo, you’ll see many people keep their dotfiles in a public repo. I use a private repo, because I’m too scared I might accidentally commit secrets, such as API tokens in my .Renviron or PyPI credentials in .pypirc.
Whenever you get a new machine or VM, getting things set up is easy:
# Your private dotfiles repo
git clone https://github.com/<yourusername>/dotfiles
cd ~/dotfiles

# A script to symlink things to your home
./install.sh
Keep a fresh cloud VM setup script
I started playing with computers in the 1990s. I’ve experienced enough hard drive failures, random BSODs, and other critical failures, that I treat my computer as if it could spontaneously combust at any moment and I could immediately lose all of my unsaved, un-backed-up work at any moment. I treat my cloud VMs the same way, as if they’re disposable (many times they are disposable, by design).
Imagine you launch a new cloud VM starting from a clean Ubuntu image. Now you need all the tools you use every day on this machine - vim, tmux, RStudio, conda, Docker, gcloud/gsutil, etc. Additionally, while I use conda to create virtual environments for installing tools for specific tasks, there are some domain-specific tools I use so often every day for exploratory analysis that I actually prefer having a local installation on the machine — things like bedtools, seqtk, samtools, bcftools, fastp, Nextflow, and a few others — instead of having to load a conda environment or use Docker every time I want to do something simple.
I keep a script on GitHub that will install all the software I need on a fresh VM. Here’s an example setup script I use as a GitHub gist.
I know this isn’t completely Reproducible™ in the sense that a Docker container might be, because I’m not controlling the version of every tool and library I’m installing, but it’s good enough to get me up and running for development and interactive data analysis and exploration.
R: Custom “verse” package on GitHub
The tidyverse is probably the best known meta-package that installs lots of other packages for data science. Take a look at the tidyverse package DESCRIPTION file. When you run install.packages("tidyverse"), it will install all the packages listed in the Imports field, including dplyr, tidyr, purrr, ggplot2, and others.
You can use this pattern to create your own “verse” package that installs all your favorite packages. This is helpful for setting up a new machine, or re-installing all the R packages you use whenever you upgrade to a new major version of R.
Take a look at my Tverse package on GitHub at github.com/stephenturner/Tverse, specifically at the DESCRIPTION
file. In the Imports field I include all the packages I know I’ll use
routinely. Note that this also includes several Bioconductor packages
(which requires including the biocViews: directive in the DESCRIPTION), as well as one of my favorite packages, breakerofchains, that is only available from GitHub (requiring the Remotes: entry).
Once this package is pushed to GitHub I can easily install all those packages and their dependencies:
devtools::install("stephenturner/Tverse")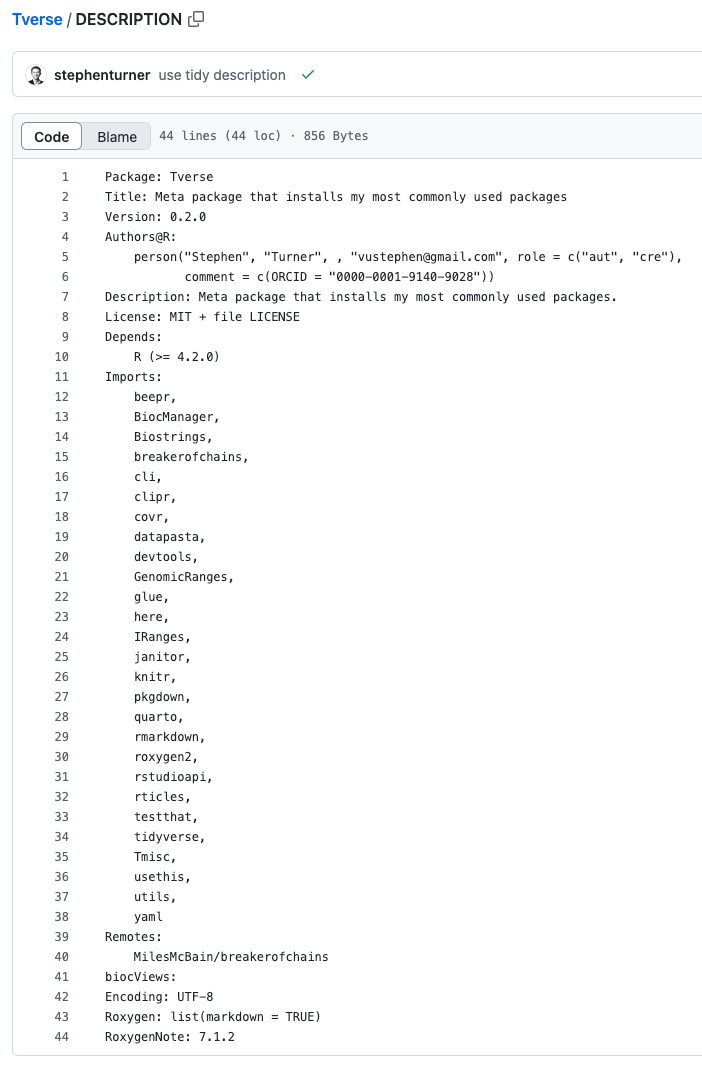
Dev containers in VS Code
Development containers (dev containers) allow you to create and use consistent development environments using Docker containers. It allows you to open any folder inside (or mounted into) a container and take advantage of Visual Studio Code's full feature set. This is particularly useful when working with teams or switching between projects with different dependencies.
The dev container docs and tutorial are both good places to start. You’ll need to have Docker running, and install the Dev Containers VS Code extension.
From Microsoft’s documentation:
Workspace files are mounted from the local file system or copied or cloned into the container. Extensions are installed and run inside the container, where they have full access to the tools, platform, and file system. This means that you can seamlessly switch your entire development environment just by connecting to a different container.

Using a dev container template
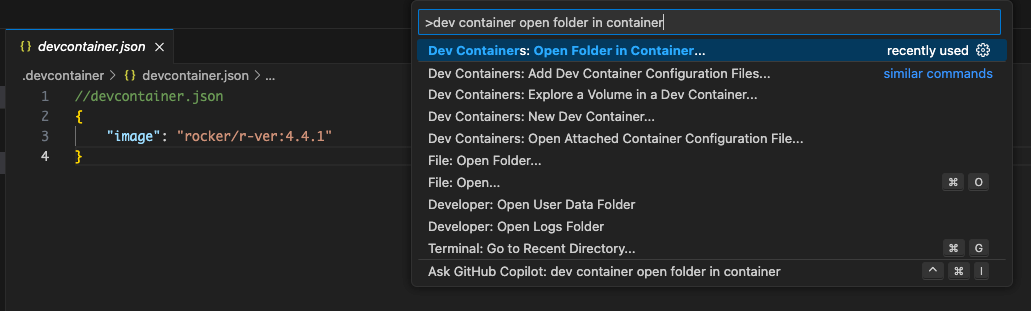
You can use any pre-built dev container templates available on registries like Docker Hub or Microsoft’s container registry. Here’s an example using Rocker with R version 4.4.1, and adds a few extensions to VS Code running in the container. You could also create your own container for development, put that on Docker Hub, then use that image.
{
    "image": "rocker/r-ver:4.4.1",
    "customizations": {
        "vscode": {
            "extensions": [
                "REditorSupport.r",
                "ms-vscode-remote.remote-containers"
            ]
        }
    }
}
Using a custom Dockerfile
You can use a custom Dockerfile to create your dev container. First, create a .devcontainer/ directory in your project with a Dockerfile and a devcontainer.json
file. Define your development environment in the Dockerfile (base
image, installed packages and configuration). In the JSON replace the
image property with build and dockerfile properties:
{
    "build": {
        "dockerfile": "Dockerfile"
    }
}
Start VS Code running the container
After you create your devcontainer.json file (either from a template or completely custom), open the folder in the container using the command palette:
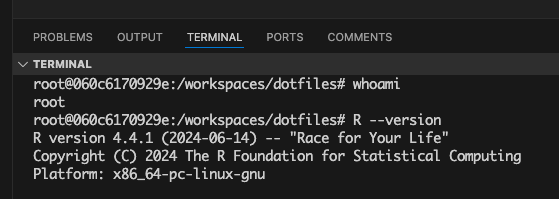
And prove to yourself that your VS Code environment is indeed using the container (I’m using rocker R 4.4.1 here). Running whoami shows I’m root inside the container (not my own username), and I’m indeed running R version 4.4.1.
Vagrant and Ansible are powerful tools for managing development environments and automating configurations. Vagrant allows you to create and configure lightweight, reproducible, and portable virtual environments, while Ansible automates complex system setups and deployments across multiple machines. However, they can be overkill for simple or personal development environments, so I'm focusing on lighter, more straightforward solutions.

No comments:
Post a Comment
Note: Only a member of this blog may post a comment.